Well I am pretty proud of myself. I promised myself to get two blog posts done in a month and here is the second one! I even did it in the shortest month of the year too, with a few days to spare. So yup that's my goal this year, trying for two tutorial posts a month. Hoping this goal with help me with traffic to my site and to help me finish some projects that I haven't and ones that are rolling around in my head. Anyway enough chatting, lets get to my block tutorial.
I'm pretty excited about my tutorial theme for the month. 10" pre-cut squares. They are so cut, and so much more versital then anyone gives them credit for. I love pre cuts because I don't have to spend any extra time picking out coordinating fabrics, washing, drying, and then squaring any of it up. With pre-cuts you can get right to the fun part, putting your project together. I honestly think they save you more than just time, money as well. I chose Primrose Garden from Riley Blake Designs, and it comes with eighteen 10" sqaures, if I was going to the fabric store for that many fabrics for a quilt, I think I might break my bank. Stackers are fairly inexpensive. You can find some in my etsy shop here, I only have a few left of Primrose Garden. Well with our further ado, lets find out how to make these super beautiful blocks.
Supplies
Tools
*Always use 1/4" seam allowance unless otherwise stated*
- 10” x 10” Pre-cut squares ( the amount depends on how big you want your quilt to be, I used 18 total because that is how many came in my stacker pack)
- Matching Thread
Tools
- Rotary Cutter
- Quilting ruler
- Cutting mat
*Always use 1/4" seam allowance unless otherwise stated*

Cutting
- Pair up two 10” squares, stacking one on top of the other. ( these speeds the cutting process up). Make sure they are lined up perfectly.

- Cut the what will be the bottom half of your square 2 ½” x 10” .Now you have a block that is 7 ½ “ x 10” and a strip that is 2 ½” x 10”. Set the strip aside
- Take the Left over block and measure 5” over and cut down the middle, making a two blocks that measure 7 ½” x 5” . Set one of those aside.
- For the last cut, measure 2 ½” on the long side of the block ( 7 ½” side) and cut. Giving you a small block of 2 ½” x 7 ½” and a bigger block of 5” x 5”
- Repeat for all the 10”x 10” blocks
- Now is the fun part, mix them all up! The easiest way to do this is create 4 piles of the different sized cut blocks you just made and then grab from the randomly to creat a new looking block made up of different patterns! Just like putting a puzzle back together.


Piecing the Block
- Take the 2 1/2" x 5" block and the 5"x5" block and sew them together right sides together making one block out of two. Do for all these size blocks. Press seams open

- Take the block you just made and the 7 1/2" x 5" and sew lengthwise right sides together, it won't match up perfectly but that’s ok we will square up later. Press seams open.


- Take the 2 1/2" x 10" cut block and sew it along the bottom of our bigger pieced block , right sides together again our blocks won't match up perfectly yet, there will be some overage. press seams open.
Squaring Up
- Time to square up, We are going to make sure our finished block measures 9"x9".
- Line up your block on your cutting mat, get your ruler, measure and cut excess.
- Repeat for all the blocks!


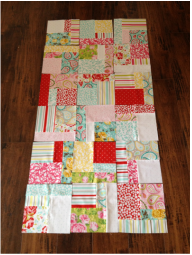
And we are done! How easy was that?! We didn't have to go out and find lots of different kids of fabric. I think that this would be a fun block to make out of fabrics that are left over from your stash. Stay tuned, I am coming up with a quilt pattern that involves this block and a jelly roll and it is SUPER cute! Enjoy the rest of February, and stay warm.

 RSS Feed