Have many of you have seen the Disney Movie UP? Isn’t it such a cute sweet movie. Loved it. My favorite parts are usually with the talking dogs. I think it is because I relate a lot to them. I totally act like them when it comes to fabric, and crafty things. You know the part where the dog is talking and then all of a sudden stops and blurts out ‘Squirrel!’. Yep, that’s me in a fabric or craft store. This can be problematic when trying to narrow down my selections of fabrics. But that’s where the fabric industry comes in saving everyone like me a lot of trouble. They invented these great things called pre cuts! Love them, they are pre cut stacks or rolls of fabric from individual fabric lines all in one nice and neat ready to sew package. But then my biggest problem comes down to what do I do with a stack of 10” squares, sew them all together? Boring. So it was time to switch it up a bit. And that’s where this tutorial comes in.
No need to cut out squares, already done! Saves me time already, I like it. Throw some borders around the block and it is an A+ eye catcher. You friends and family will think you spent hours and days matching up fabric and patterns, and piecing, and it won’t take you more than an afternoon to throw together! Let’s get started on how to piece this block!
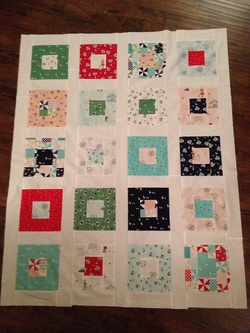
Today I am just posting on how to piece these blocks together. It is up to you how ever you want to finish your quilt, I added borders and sashing, making each block stand alone in all it's glory.
Supplies
1- 20 Block 10” Stacker
*I Used Country Girls from Riley Blake Designs it had 21 blocks so I didn’t use one block*
Tools
Cutting Mat
Quilting ruler
Rotary cutter
Pins, Thread, Sewing machine
Cutting the Blocks
1. Before any cutting can commence you first need to open your stacker and admire the fabric. My favorite part J *sigh*.
2. Now that you have your squares laid out, you can now pair them together however you want. One way that helps me is I try to find contrasting colors that look nice together.
3. Take your first pair of 10” blocks, stacking them on top of one another (saves cutting time) line them up super good and make these cuts starting from the left Measure over 3” and cut
Measure over 4” and cut
Total strips and measurement for 1 block are 2- 3” strips and 1- 4” strip
No need to cut out squares, already done! Saves me time already, I like it. Throw some borders around the block and it is an A+ eye catcher. You friends and family will think you spent hours and days matching up fabric and patterns, and piecing, and it won’t take you more than an afternoon to throw together! Let’s get started on how to piece this block!
Today I am just posting on how to piece these blocks together. It is up to you how ever you want to finish your quilt, I added borders and sashing, making each block stand alone in all it's glory.
Supplies
1- 20 Block 10” Stacker
*I Used Country Girls from Riley Blake Designs it had 21 blocks so I didn’t use one block*
Tools
Cutting Mat
Quilting ruler
Rotary cutter
Pins, Thread, Sewing machine
Cutting the Blocks
1. Before any cutting can commence you first need to open your stacker and admire the fabric. My favorite part J *sigh*.
2. Now that you have your squares laid out, you can now pair them together however you want. One way that helps me is I try to find contrasting colors that look nice together.
3. Take your first pair of 10” blocks, stacking them on top of one another (saves cutting time) line them up super good and make these cuts starting from the left Measure over 3” and cut
Measure over 4” and cut
Total strips and measurement for 1 block are 2- 3” strips and 1- 4” strip


4.Take the 4” strip from the middle (keep the pair stacked still) and you will make two horizontal cuts starting from the top.
Measure across 3” and cut
Measure across 4” and cut.
Total blocks and measurements left from one 4” strip are 2- 3”x4” blocks, 1- 4”x4” block
Measure across 3” and cut
Measure across 4” and cut.
Total blocks and measurements left from one 4” strip are 2- 3”x4” blocks, 1- 4”x4” block
5. Separate all the pieces and put the individual blocks back together like a little puzzle. Now the magic happens, time to switch!
6. Take the Middle 4”x4” block from one cut up 10” square and swap it with the 4”x4” block from its pair!
You just took a simple block and made it beautiful without it being crazy complicated or time consuming. Repeat this process for the rest of your 10” Block pairs. Be sure to stack neatly and keep everything together so nothing goes missing.


Piecing the Blocks
7. Grab one of the cut up blocks, middle already swapped out, and take the 3 middle block pieces and laid them out like I have here.
8. Take the top 3”x4” block and flip it down onto the 4”x4” block, right sides facing each other. Pin and sew it together along the top edge using a ¼” seam allowance
**always use a ¼” seam allowance in quilting unless otherwise noted**
9. Now take the bottom 3”x4” block and sew it to the bottom edge of the 4”x4” block, flipping it up, right sides facing each other. Pin and sew. ***
10. Repeat this process for all the middle section blocks. ***


11. When those are all done take those pieces over to the iron and press the seams on the back open. And you now have the middle section of the block finished.
12. Find the 2 matching 3” side strips and pin them, one on each side right sides facing together, and sew them to the middle strip. ** Those pieces will be longer and the top and bottom will not match up anymore with the middle this is OK! We will square it all up when we are done.
13. Repeat for all the blocks, then take them to the iron and press the seams out.


14. Back to the cutting mat, take your ruler and line it up with the top of the middle strip and cut off the excess from the 2 outer strips, making it one nice clean line straight across.
15. To square up, make sure you measure the length and the width of the pieced block, should now be
8 ½” x 8 ½”
15. To square up, make sure you measure the length and the width of the pieced block, should now be
8 ½” x 8 ½”


Your Finished with all of your blocks! And it only took me about an hour from start to finish. It is up to you how to finish your quilt. I decided to add borders but the use of these blocks could be endless. Sky's the limit, dream big, get creative. Let me know what you DID?!

 RSS Feed